
Neglect?
For most people they barely rival the discovery of a wad of bellybutton fluff in the grand scheme of things. In fact many would go so far as to call them boring, uninspiring and completely sexless. But why are we so keen to neglect this most wonderful of materials? Do they attract giant man eating Asilidae and no ones told me? There most definitely seems to be something wrong.
The ideal fly should be quick and easy to tie. That doesn't mean rough, sloppy or fragile, it just means simple. Biots epitomise simplicity, but unfortunately their reputation for being rather unwilling and stubborn eclipses this. Shameful indeed, as most problems are nothing more than by-products of the way in which the material is initially treated.
Get this right and the results are so realistic you may wet yourself. Segmentation is exceptional, durability is abundant and sexiness, well, it makes the playboy mansion look like Chatsworth house.
What are Biots?
Get hold of a wing and take a look at its primary flight feather, if you are not sure where the primaries are then take a look at North Country wets. Biots are the sturdy barbs found along the back edge of this feather. The narrow set of barbs in other words.
All birds have biots, they are compulsory, flight simply couldn't happen without them. Only two species however provide those most commonly used in fly tying, the goose and the turkey.

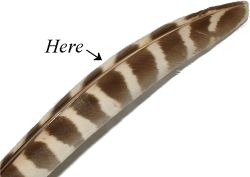
The picture above displays a biot from each of the two species, the left being goose and the right turkey. Goose barbs are much shorter and narrower than turkey biots, resulting in a limited number of uses. Whilst good for tails on stone fly nymphs and wing buds on buzzers they are too short and awkward to use for bodies on all but the smallest of flies. Consequently they tend only to be used by short stubby people with hairy palms.
Turkey biots on the other hand are much longer, significantly easier to tie with and spend most of their days being fondled by underwear models in Portugal. They are the items of choice where bodies are concerned.
Biots generally come in the form of a split quill, which, as the name suggests, will have been sliced down the centre and separated from the non-biot side of the feather (see pic), or in full feather form. Either way they are cheapish (they're just bits of feather remember), are available everywhere and come in a wide variety of colours specially suited to those of a creative disposition.
Preparing biots
Biots have an unfortunate reputation for being fragile and hard to work with. Unfortunate indeed, as it's complete and utter rubbish. When treated correctly biots are no harder to work with than anything else and can be incredibly robust. Confidence, patience and a little bit of know how are all that is needed to create bodies second only to the naturals themselves.
First on the agenda is size. Biots are not all the same length; typically they are short at each end of the quill and longer in the middle (edging towards the top). All are useable, although the shorter barbs tend to suffer from biot envy and have a propensity to hate the world as a result. Best avoid them in other words; size does matter on this occasion so go for the lucky ones.

Once selected, the lucky biot must be removed. To achieve this simply pull the biot directly down until it begins to peel away from the quill. Continue peeling until you reach the biot below, about 2.0mm. Now pinch the biot tightly up against the shaft, twist 90° and rip off. Peeling and twisting the biot in this fashion makes it so much easier to remove. Try with and without, you'll notice that by just tugging in any old fashion will result in as many snapped barbs as it will good ones.
Thirdly, and most importantly of all, keep them damp. They don't have to be immersed, stick them down your undies if it's humid enough down there, as long as they're moist it doesn't really matter. The reason for this is no different to that of striped quills, they are simply too brittle to be used dry and will split on almost every attempt. Soaking makes them incredibly tough and very pliable, so tough in fact that it's difficult to break them, honest, go and try it.
All becomes clear
I bet you're still wondering why I didn't use scissors to remove the biot from the quill; well the answer to that question is in the notch. The notch? Yep, the notch. Take a look at the butt end of a biot, right near the top you will notice a slight notch.

Also notice that one side of the biot is somewhat thicker than the other and possesses a slight ridge of fibres. Hold one up to the light and bend it, you will be able to see this clearly. By taking note of these factors a biot can be used to create two distinct body types: smooth or ridged.


What you end up with is dependent on which side of the biot is used as the trailing edge i.e. the side facing the tail end when being wound forward. The notch comes in handy, as a useful indicator that shows which way the biot should be positioned to achieve this. For example, having the notch facing forward will result in the trailing edge being that of the bristled side, causing a ridged body. Conversely, tying with the notch facing backwards will result in the opposite: a smooth body. Cutting the biot from the quill results in this useful little indicator being left behind. And we all know what happens then don't we? Needless to say the more sensitive tiers amongst you may have become extremely alarmed.

So now that you know all this...
Hook - Emerger 14, 16, 18, 20 and so on, i.e. a curved hook such as the partridge Oliver Edwards nymph/emerger, klinkhammer or any *light* grub hook. Just to be a contrary bugger I'm using a long shank sedge hook, which is really a similar sort of thing.
Thread - Black, brown or grey.
Tail - Medium dun hackle fibres.
Abdomen - Grey turkey biot
Thorax - Mixture of natural grey rabbit and dark olive possum. You don't have to use possum, I've just started using it and like it's shagginess, as an alternative hare or squirrel will work just fine.
Wing - Natural CDC
The loft ladder
Rung 1 - Start the thread, wind down to the bend and tie in a bodies length bunch of medium dun hackle fibres. Next, wind over the waste and return the thread back to the tail. As biots are flat they will not form much of a mouthful over a single layer of thread. Winding over the tail butts will help this a little by creating a slight underbody. If you want to accentuate this further just wind up and down a little, avoiding the tail area by a couple of millimetres (you certainly don't want lumps there), until your happy with it.

Rung 2 - The tie in and first turn are the trickiest part of using biots. If you tie in something flat, facing backwards it is natural for the material to twist and deform as it is pulled up perpendicular to the shank and wound around the hook. This is only a problem on the first turn, but is extremely irritating nonetheless.
Avoiding this couldn't be simpler. Take a prepared biot and align it so as to create a ridged body (notch forward). Now hold it in front of the hook shank with the tip facing downwards.
Whilst keeping the biot held in this position trap it in place by adding one lose thread wrap over the top. Don't tighten down yet though, the material should not be under any undue pressure, just enough to prevent it from falling off.

Now take hold of the biot and pull it towards the eye until it is perpendicular to the shank. The tip should move in the opposite direction to the butt as you do this, if not you are using too much tension. Once in position, whilst keeping tension on the biot, begin to tighten down on the initial wrap of thread. Upon tightening the butt end of the biot should remain pointing up/backwards slightly, facing the direction it is to be wound.
This way the material cannot deform as it might have, being tied in the conventional way. It is simply being wound forward, rather than being pulled up and twisted over.

Now simply wind over the tip and carry on up the shank, stopping about one third of a hook shank distance from the eye.
Rung 3 - now take hold of the biot using hackle pliers and begin to wrap around the shank. Upon the first turn make sure the biot remains facing the right way. It will want to twist slightly which will be due to lack of tension, so don't be scared of it, the firmer you are the better. Continue winding up the shank, overlapping the front edge of each turn, until you reach the finish point for the abdomen.

Rung 4 - finishing the body is another area that seems to draw unwarranted concern. Upon finishing the body the biot will be wound well into its butt, where it is rather wide. How can you tie something this wide down without it crinkling up? The simple answer is that you avoid the tag. This goes for all awkwardly wide materials.
Instead of crossing the tag and crushing it down, take the thread up over the biot and let it *rest* down the other side (over the previous segment). Don't tighten down yet. Now take the thread loosely around this segment a couple of times and pull tight. Done, now clip off the tag end level with the shank and wind over the waste.

Using this method it is impossible to get an untidy result. You will be winding over something with a round cross-section (the previous segment) and therefore cannot crush, ruffle or damage anything.
Rung 5 - with the thread hanging at the beginning of the thorax, create a rope of dubbing and wind on up to the eye, stopping just short. Now go find a piece of Velcro and rough up the dubbing by pulling it backwards over the thorax a couple of times. If about now you are wondering why nothing is happening then please try the non-fluffy side of Velcro ;)
Looks cool though doesn't it.

Rung 6 - Select three good CDC feathers, line up the tips and hold them firmly by the butts. Now slide your thumb and forefinger up the feather, thus trapping the barbs, until you get within a fly bodies length of the tips. Swap hands, take the bunch, pinched firmly in between you other thumb and forefinger and offer it up to the fly. It should roughly extend towards the end of the body. Once in position use the pinch loop method to fix in place, followed by a couple of good sturdy thread wraps.

Rung 7 - To finish, remove the waste ends with an angled cut and form a nice conical shaped head.
Now just whip finish and varnish, job done.

Deadly & simple. The ideal combination.
Regards
Ben