
Ok, Ok, I know, you'd think we'd have moved on to tying a fly by now, but in the familiar tradition of these - planned weeks in advance finished at the last minute - pieces I have decided to completely reverse the exciting climax of what I like to call, "the boring bits", and would instead like to go through what I like to call, "the almost exciting bits".
You could in fact just ignore all this and go to proportion in the glossary, which would save a lot of typing, thought provoking discussions on the BB and me having to tie 'proper' flies for the pictures. I don't suppose you will so I'll continue with my all-new updated glossary style into the very serious and utilitarian subject of:
Proportion in flytying (although also important in many other facets of life)
Applying materials in any particular fashion you choose will lead to some very scary albeit interesting creations indeed. They may catch fish; in fact they probably will but only very stupid ones possessing white sticks and guide fish. Avoiding results reminiscent of John Merrik on a hook and remedying poor fashion sense can be easily achieved by applying materials in a certain way depending on what kind of fly is to be created. Within fly tying there are certain guiding principles that help the tier achieve the correct result, ensuring nothing is too fat or thin or too long or short. To take note of these principles guarantee the fly can be recreated many times over.
Proportion is thought to be more necessary within the tying of imitation patterns, true, but I am not going to be dealing with specific insects in any shape or form at the moment that's for another time for now everything is generic and non-fussy. There are flies in all four fly groups that can cover practically everything going and will quite happily see you throughout many fruitful seasons. The proportioning of these flies hold equal importance to any direct insect imitation; they may not share specific anatomical characteristics but they do share similarities such as movement, size, shape (the silhouette it throws) and colour. Whilst not making you irresistible to fish, taking note of these 'triggers' will definitely improve your chances.
The matter of shape is of particular importance to the beginner and is arguably the single most important factor worth taking into consideration, leaving movement, size and colour in the realms of practice and experimentation. Learning to correctly proportion flies takes time and experience (not very much thank god), there will be times when the hackle may have been placed too far back or the head made too big etc. It is at these times that an understanding of proportions comes into it's own.
The nymph
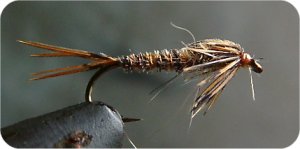 The nymph is an artificial representation of an invertebrate's aquatic larvae/pupae stage and can be tied accordingly to imitate any insect you could every wish for (or not as the case may be). They can be weighted to reach any sub surface position you please or left weightless to hang under the surface film imitating the emerging insect. While nymphs can be tied to imitate many species of insects with many different body shapes most can be covered with one style tied in varying sizes.
- The tail - Should be either one third or half the length of the hook shank.
- The abdomen (body) - Is usually two thirds of the hook shank and should taper toward the tail (arse end)
- The rib - Can vary from anything to 4 to 10 turns, typically the number of turns varies with the length of the hook shank (the longer the shank the more turns) and the thickness of the rib material, so in this respect there is no hard and fast rule. When creating direct imitations however, the number of ribs should correspond with that of the chosen insect, the majority having ten (or thereabouts).
- The thorax (torso) - Should take up the remaining third of the hook shank and care should be taken not to finish the thorax to close to the hook eye, aim to finish a couple of millimetres back to ensure room is left to remove excess materials and to finish without covering the hook eye.
- Legs or hackle - The feather fibres or synthetic material imitating the nymph's legs should be the same length as the thorax whilst the head should be the same length as the hook eye.
The wet fly
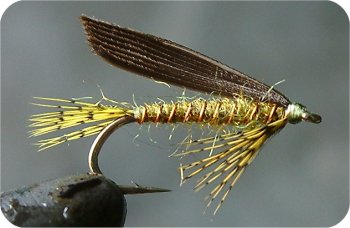 Wet fly terminology can be confusing to say the least; many would argue the wet fly to be an artificial representation of an invertebrate's aquatic larvae/pupae stage, confused yet? I am. If you placed a wet fly and a nymph side-by-side you'd wonder how they could be construed as being the same thing. The simple answer is that the traditional wet fly was the predecessor to the modern nymph and cemented its effectiveness before we started thinking about abdomens, thoraxes and wing pads etc. They are impressionistic flies that remain firmly in place due to their continuing effectiveness and may show us how anatomically correct imitations are not all there're cracked up to be.
The primary difference between the wet and the nymph lies in that the wet will rarely be weighted, and as such will not be designed to act anywhere but just in or underneath the surface film, whereupon it represents the ascending/hatching fly (emerger). Wet flies are tied with soft, webby, mobile, hackles to ensure their ability to sink easily and range from nothing more than a short slim body with a sparse hackle, to full-length bodies and prominent quill slip wings. The degree of wets available is staggering - more so than nymphs - and can be confusing, in every category of game fishing from salmon to trout, river to lake and north to south there are different styles of wet fly that have stemmed from different schools of thought over hundreds of years. But don't pay any attention to that, like all things they can be simplified (and they will).
- The tail - As with nymph.
- The body - Should extend from the back of the head to the point opposite the hook barb or where the shank ceases to be straight.
- The rib - The standard is usually four or five but varies with the length of the hook shank (see nymph).
- The wing (if present) - In general the wing should extend to just past the bend. However, many dressers opt for one and a quarter to one and a half times the length of the hook shank, both lengths are equally effective (it's personal preference). The wing width should be three quarters of the hook gape.
- The hackle - These fibres should be long enough to reach the hook point.
- The head - As with nymph.
Note: this a general wet fly and yes, I know spiders should have a much shorter body so before you complain go tie a fly and calm down.
The dry fly
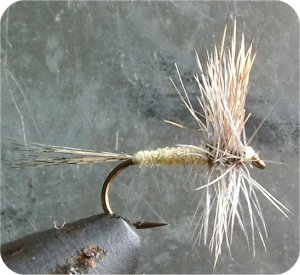 The dry fly is a representation of a fully emerged fly, most are dressed with firm, stiff hackles and tails to ensure they stand proud of the water surface, alternatively some are designed so as to allow certain parts to break and sit in or under the meniscus as well. They can be under dressed for calm water or over dressed for increased buoyancy in fast turbulent currents. The proportions listed below are based primarily on flies of the up winged family, i.e. Mayflies, the position of the wing and presence of a tail determines this. While attempting other flies these are the most likely changes you'll make with all other factors being largely applicable to all basic dries.
- The wing (if present) - Is usually twice the length of the hook gape.
- The tail - Should extend to either one or one and a half times the length of the body.
- The body - Should extend from the base of the wing to a position opposite the hook barb, it should taper towards the tail and should cover two-thirds the length of the hook shank.
- The rib - Usually anything above four and under ten turns (See nymph).
- The hackle - The length of the hackle fibre should be one and a half times the hook gape and should constitute the remaining third of the hook shank. After the hackle has been wound there must be enough room in front of the hackle to apply a head, this should be checked before the hackle is tied down and the stalk snipped off.
- The head - As with nymph.
Conclusions
In future when the tying section eventually takes off there will be constant reminders of the above, since it is I believe the key, not only to comfortable frustration free tying but also to effective easily reproducible flies. It is therefore a reference piece to look back to every now and then as a reminder, so I hope it helps.
I would like to add that these are general examples and cannot imitate every insect, consequently while good for beginners they cannot be seen as strict rules (I'm sure you know by now I advocate breaking all the rules and fully recommend you do the same). Once experience has been gained the techniques can be applied to many other styles of fly ensuring correct and efficient fly tying across the board.
Regards
Ben
Well that was painless, wasn't silly at all this week.
Next Week: If my new milk carton light tent and adapted ring flash (don't even think about it) are working ok, and I actually manage to master the art of fly tying action photography we shall move onto the bits that are too big to put in the tying instructions, or what I like to call, the "bobbinsuckingthreadstartingpinchlooping method" followed by the classic Finnish whip manoeuvre
P.S, Streamers will come at a later date, as will the wonderful world of pointless frustrations know as, "The Saltwater Bit".
P.P.S, Why haven't you ordered any bobbin threaders yet?