


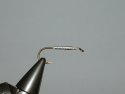


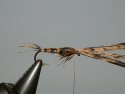


One of the oldest weighted nymphs in use today, the pheasant tail is considered by many to be one of the most effective patterns ever designed. Conceived by Frank Sawyer (1907 - 1980) who was a noted angler and river keeper on the Hampshire Avon the PTN can imitate a wide range of aquatic fauna and has over the years established it's effectiveness by contributing to the sticky end of many a good trout.
The original was as simple as they come and made use of nothing more than a feather, some copper wire and a hook. For example, legs were not included due to sawyer's belief that the natural insect swam with them facing backwards and tucked into the body - a minimalist fly if ever there was one I think you'll agree.
Whilst this pattern still proves its worth on a regular basis it just doesn't do it for me. My (perfectly legal) obsession with both legs and maracas may have something to do with it and I really don't think Frank would mind that much anyway, so today's variation appears a little less than traditional.
What you need
Hook - Partridge captain Hamilton nymph hook, sizes 18 and below (size 12 in this case)
Thread - 8/0 and finer or Roman Moser power silk in black or brown
Weight - Sticky back lead foil (thin)
Tail - Pheasant tail (centre quill). Centre quills are sold individually or as part of a complete tail. They are cheap, usually 50 - 60p, not often more than a pound and are available everywhere. Golden, natural and dyed varieties are equally useful but the former is one of my favourites so that is what I will be using today.
Rib - fine copper wire
Body material - as with tail
Thorax - peacock herl (natural). The original was tied using pheasant tail barbs, this works well and for a while I favoured it, but then I saw one tied with a peacock thorax and thought "yeah", that looks tasty. I can't remember exactly where I first saw it but came across it again recently whilst reading John Gierach's excellent book 'Good Flies, favourite trout patterns and how they got that way, Lyons Press, (2000).
Thorax cover - as with body
The stairs
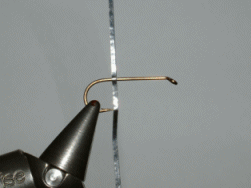
Step 1 - place your hook in the vice. Now take your sticky back lead foil and cut a strip about 1.5mm wide whilst ensuring it is long enough to comfortably work with. Doing this with scissors takes practice so I use a scalpel and a ruler. Having a scalpel in your tying kit is a great bonus and helps enormously when you're looking for perfect straight cuts. They are available from some fly tying dealers but if you can't find one email me and I'll point you in the right direction.
Step 2 - Hold the sticky face alongside the shank a quarter's distance away from the bend and wind in neat touching turns towards the eye. Stop about one wrap short, snip off the waste and using your fingers smooth over any bumps. Lead foil is so soft that you don't even have to use scissors; I just pinch it as close to the shank as possible and pull whilst pressing down with my thumbnail. Now take the waste you just snipped off, re-attach it at the beginning of the thorax area and wind forward stopping one wrap short of the previous layer. You now have the second under body variation.
Step 3 - Start the thread upon the underbody and wind over the whole lot (right to the bend this time) a couple of times to hide the steps between the hook shank and the two layers of lead. But remember, the lead has provided the bulk, to continue winding on thread until you have a perfectly smooth body will result in an unnecessarily fat outcome. Wind in open crisscross like turns, you don't have to hide the steps completely (you won't be able to), just smooth them out a little. Once prepared you should have a nice weighted underbody with the thread hanging ready for the tail.
Step 4 - Tie in a tail (of about four barbs) and a rib, but *don't* trim any of the waste, just wind the thread - under the barbs, over the wire - to about a third of a shank away from the eye. The amount of pheasant you use should be dependant on hook size (More for bigger, less for smaller). But most importantly, remember, your shape is already there so in this case less is most defiantly more.
Step 5 - This is the clever bit, take hold of the waste end of the tail and wind it around the hook and up to the thread, now tie down the barbs with no more than three wraps of thread. On the first turn I always wind back slightly to hide the thread upon where you initially tied down the tail. Do not wind the fibres over themselves or you will get a weird little bump. Think BUF (Back, Under and in Front). Body done!
Step 6 - Wind the rib in open spiralling turns to the end of the body. Wrap in the opposite direction to the barbs; this will criss-cross the pheasant making an incredibly durable body.
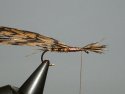
Step 7 - Take between 12 - 16 pheasant tail barbs (remembering to do so by stroking the fibres out at right angles to ensure the tips remain in line), and hold them on top of the hook shank. Don't tie them down yet! The tips of these fibres are not going to be trimmed on this occasion; they are soon to be pointing the opposite way in the form of legs.
Remember proportion, the legs should be roughly the same length as the thorax. For this reason position your wing pad fibres ensuring the distance they project out over the eye is roughly equal to that of the thorax length. Why roughly? Well, when you fold something backwards it will loose some of its length in the fold, the legs will therefore appear much shorter than you will have envisaged. In my opinion to be a little to long is always preferable to being a little too short, fish aren't really that fussy but given the choice I certainly know what I'd prefer. Long, slender and mobile, or Short, stubby and stiff, do you get me? Shake your maracas and say it one more time.
Ok, once your happy with the position tie down and wind over towards the eye, "Put those scissors down!!" and wind back to the beginning of the thorax.
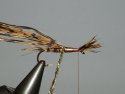
Step 8 - Select two to three pieces of peacock herl, tie them in at the beginning of the thorax, wind over the butts and snip off the waste.
Step 9 - Now take hold of the peacock herl, give it a little twist, wind forward in neat touching turns and stop just short of the eye. The reason for twisting peacock herl lies with the fact that it's a rather fragile material and tends to snap at the most awkward of moments. Twisting forms a semi-round cross section that is far stronger, but whatever you do, don't twist too hard; the red mist thrives in the presence of peacock.
Step 10 - The thread should now be dangling a couple of mm short of the eye next to the projecting barb tips. To form the legs separate the bunch of fibres to form two equal parts, now with your thumb and fore finger stroke the fibres back away from the eye and below the shank. Hold in place and take several wraps of thread over the fold to hold in place. If after this the fibres refuse to comply or you haven't pulled them down or under enough then pull the fibres - gently rocking them - further into position whilst adding additional wraps of thread. You could of course just undo the whole lot and position the barbs accordingly before re-wrapping. It's one of those funny little procedures that seems tricky at first but the bonus of using pheasant tail is that it is exceptionally tough and will tolerate being pulled and wound over quite a few times. So don't attempt this while holding your breath, if it doesn't look right pull it around until it does.
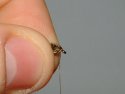
Step 11 - Next, pull over the remaining pheasant tail barbs to form the thorax cover, tie down with no less than three wraps of thread and trim the waste (at an angle, see first fly). Now with further wraps of thread form a nice smooth head of roughly the eyes length, whip finish and varnish.
Done!
After thoughts
All fly tying methods are interchangeable, so as an experiment try tying this fly with the legs and under body of the hares fur nymph and visa versa. Think of a fly as a collection of components, mix it up a bit and you may even come up with something new. Oh, and I know aquatic insects don't generally posses around sixteen legs but there you go, trout can't count anyway, if you do want to be more accurate however, snip a few off.
Regards
Ben
Next time: Tantric fly tying for the beginner, of course it can take up to 8 hours complete a hare ear but it sure feels good afterwards. And remember; never test the depth of water with both feet.