
The Winged Wet
A very, very traditional style of fly, the winged wet is *the* classic wet fly. Primarily designed to act just in or underneath the surface film, whereupon they are commonly thought to represent the hatching fly (emerger), the winged wet can prove a valuable asset to many an angler's collection. Unlike the spider pattern they have an altogether more orderly appearance, more symmetrical if you like, copying an insect just emerged or emerging as nature intended. The primary reason it took quite a few years for the spider pattern to firmly establish itself was down to the popular belief that the winged wet was more of an appropriate imitation. Look at it their way, how the hell could that scruffy wingless thing pass for a mayfly, the legs are all over the place, it's like an Essex girl on a Friday night.
The winged wet is simply trying to be more of a direct imitation than an impression. Wet flies of this style are most commonly fished under the surface, downstream and across the current, where it is nigh impossible to get a natural drag free drift. This has always fascinated me. I guess the idea most likely just came from someone who did it by accident and began catching fish as a result, a lucky bugger in other words.
The problem of why fish take imitations in varying positions throughout the water column where they - in theory - shouldn't be, is the easy part of the equation. Insects get washed about in riffles and by wave action on lakes and sink. It is based around the same reason trout take sunken dry flies and emergers more readily than those floating high upon the surface. Trapped victim: easy meal etc.; look at the spider pattern.
However, why down and against the current? Do mayflies have propellers? Are caddis pupae being cross bread using Ian Thorps DNA? As far as I can tell the possibility of Olympic quality swimmers being present in fly form is pretty low. Consequently, I very much doubt the likelihood of a drowned fly deciding to swim back up to the surface and successfully beating the current, as being a natural occurrence. So why do fish take flies behaving in this manner?
Personally I think we give fish too much credit, yes they can appear picky and intelligent, but sometimes the pure fact that they see an imitation not too dissimilar to that of they're prey item, in a similar position to those it has previously consumed that morning, just sitting there or temptingly curving around in the current is enough for the fishes predatory instinct (stomach) to momentarily take precedence over its survival instinct (brain).
Add some fast water to the equation and our quarry must make a snap decision as to weather or not to take whatever is coming towards him (or her, no sexism here).
However, in both cases there are elements of unnatural behaviour, more so in the former, and despite fish being largely accepting at times, the survival instinct will always be there as a reminder of the several hundred equally tempting, less fluffy, morsels passing by at the same time. This, not surprisingly, is why WC Stewart's upstream approach, as Paul recently explained, works so well. Take away the drag associated with downstream fishing and a major element of suspicion is removed, it is no longer why does he? But rather, why won't he? That's another kettle fish altogether though, every method has its value and every method catches fish. Although watch out for those super bugs swimming up stream, I hear they're real meanies.
The March brown
The March brown, if you want to get specific, imitates the March brown mayfly, no surprises there. If you want to get really specific it is also known as Rithrogena germanica, which is Latin for big fat hairy fly. It may also be Latin for big fat hairy German, although I think that's just a rumour.
Unfortunately, the March brown isn't all that common (useful these pattern articles aren't they). I find them quite a bit, despite fishing nowhere near their supposed north and western distributional limits, but most people do not. So if you're looking at this from an imitative fishers point of view please look away now.
If however you're one of more adventurous anglers amongst us then "STOP", don't scroll through that favourites menu just yet; randy housewives can wait. The MB's effectiveness as a general searching pattern is well documented (well it is now), so fear not, give it a go and you may be surprised.
It is a hare's ear with a wing, what more can I say, 1 + 1 = 2. You'll know by now of the hare's ear's any time, any place value, so is it safe to assume the wet version will work with equal effect? Well yes (whoopee), isn't life great.
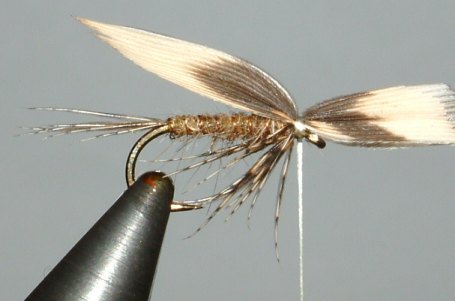
What you'll need
Hook - Any general wet or dry fly hook. Partridge captain Hamilton YL2A, size 14 for example.
Thread - Any dark thread. Brown, black, dark olive, etc. I'm using Roman Moser power silk, I love this stuff, quite literally, my obsession makes Lars and his bags seem like a passing phase. If the inventor were a woman I'd happily marry her.
Tail - brown partridge or golden pheasant
Rib - fine copper wire
Body - Dark hare. For most of my hare patterns I like the very dark fur from between the ears and down the centre of the mask, pale hare fur just doesn't do it for me. Shop bought dubbing usually comes in the traditional pale sandy colour, dyed varieties in different shades are available but I find the best bet is to just buy a hare's mask, locate the dark areas, cut a few clumps and mix it to ensure an even blend of soft under fur and buggy guard hairs. To get an even buggier appearance simply add more guard hair.
Wing - Hen pheasant or Woodcock.
Legs/hackle - Brown partridge. Back feathers, the darker the better.
The stairs
Step one - with the hook placed firmly in the vice, start the thread and wind on to the end of the shank, roughly opposite the barb.
Step two -
Select 3 or 4 partridge barbs for the tail along with a length of
 copper wire for the rib and tie down, before winding forward over the butts
and back down to the tail.
copper wire for the rib and tie down, before winding forward over the butts
and back down to the tail.
You can if you want wind around the thorax area a
few times to build up a slight tapered under body, your choice, do it the
natural way if you prefer.
Step three -
 form a fine rope of dubbing and wind on to a couple of mm short
of the eye, followed by the rib. Remember, ideally you want a slight taper
up to the head.
form a fine rope of dubbing and wind on to a couple of mm short
of the eye, followed by the rib. Remember, ideally you want a slight taper
up to the head.
Step four - take a partridge feather, hold it by the tip and stroke the fibres backwards.
The fibres should be long enough to extend just past the hook point when tied in.
Tie down the feather with the upper side facing forward and wind on one to one and a half turns.
Now trap the quill and trim the waste.

Step five - Now what we have here is basically a spider pattern,
but for this type of fly we want the legs to be underneath the fly in an all-together more orderly fashion.
To do this, separate the hackle evenly on both sides, now with your thumb and forefinger stroke the fibres
back away from the eye and below the shank. Hold in place and take several wraps of thread over the fold to hold in place.
If after this the fibres refuse to comply then manipulate fibres by gently rocking them further into position whilst adding
an additional wrap of thread.


Step six - Take your hen pheasant wings and choose a secondary feather from each wing. Make sure you choose corresponding quills so as to ensure they are as alike as possible. From each quill remove a slip of equal width, about three quarters of the hook gape is the general rule. There are many instruments available to ensure each slip is equal but the best by far is to simply use your scissor tips. Open the scissors to the desired width, insert the tips into the quill and slide them along to separate any adjoining barbs. DON'T CUT YET; you want to keep those scissors as they are to ensure you get the same wing width for the opposite side. Once two slips have been selected snip them out.
Why corresponding quills from opposite wings? There are two reasons. One, when tied in, the wing should appear the same on either side of the fly i.e. the upper, more vividly coloured side of the feather. If you were to cut slips from the same feather and put them together you would have an unmatched dark and light side. Two, the natural curvature of feather would ensure the wing curved to one side, rather than being straight. Taking the slips from opposing feathers on each wing ensures they fit together perfectly, with the natural inwards curve of the two slips counteracting each other to give a nice straight, evenly coloured wing.


Step seven - Hold the slips side by side, once you're sure they are identical (more or less) place the two slips together with the dull side facing inwards. Now line the wing up along the body, it should extend to around one and a quarter to one and half times the length of the hook shank. I go for one and a quarter, some prefer shorter, it's not important, just personal preference. You'll also notice that the wing can be tied in with the point sweeping either up or down. To have the point facing up is the traditional method, although having them pointing down arguably gives more of a natural outline. I tie in the former style, there are no reasons for this, I just do, go figure.
 Once you're happy with the position, tie down using the pinch loop method, about three wraps should be
sufficient and trim the waste. Take an additional couple of wraps over the stump to smooth out, no more
though, when it comes to heads keep the thread wraps to a minimum, a fat head is undesirable, ask any woman.
Once you're happy with the position, tie down using the pinch loop method, about three wraps should be
sufficient and trim the waste. Take an additional couple of wraps over the stump to smooth out, no more
though, when it comes to heads keep the thread wraps to a minimum, a fat head is undesirable, ask any woman.
Step eight - whip finish and varnish

Done!
Further notes: A wing and a prayer
Up until recently I'd never really thought of how I actually set a wet fly wing; it was always one of those do and don't think kind of things. However, a recent discussion has prompted me to look a little deeper into what determines a good (that's sexy) wing.
There are two main points to look at. One, the amount of pressure used to hold the wing in place as the loop is closed over the quill slips, and two, the amount of pressure applied with the thread itself as the slips are bound to the shank.
Ideally the fibres should compress on top of each other in a (roughly) straight line. If the first turn is applied with too little support the wing will fold or push over. On the other hand, if the wing is treated too firmly the thread may bite down a little too hard, resulting in a cut wing wet. Ending up with a good result is about finding the balance between the two. I tend to hold the wing very firmly in place right up until the last minute, whereupon I gradually ease off the pressure as I pull down over the slip. During this procedure I never open my fingers to the extent that the fibres can compress anywhere but on top of themselves (or as near to as possible). It's a feel thing.
A second point worth taking note of is that of wing position in relation to thread tension.
The first wrap (or two) determines the angle of the wing, e.g. the tighter I pull down; the higher it will point. I will therefore apply the first wrap to match the amount of tension needed for the wing to be set in the correct position, no higher than roughly (*very* roughly) forty-five degrees, it's a dry fly wing other wise. I'll then apply the next wrap a little tighter, and the next a little tighter still. What you effectively end up with is a slight taper from the tie in point down to the eye. As the first (and second to a lesser extent) wrap determines the wings angle, the latter wraps can be as tight as you like for security, whilst not effecting the wings position to any great extent.
This is all nit picking perfectionist stuff really, in fact it's borderline condescending; but I'm going through it for the sake of completeness. It's fly tying for the sake of fly tying, if you want perfect wings then go for it, if not, you're probably more interested in catching fish and chasing women. you decide.
Happy tying
Regards
Ben