
Tracy&James | Thursday, 8 December 2016
This week I thought I’d get the pushy/pully, crushy/breaky machine back in action (or the Instron mechanical tester for those unfamiliar with its technical description). The subject of my test was fly line loops, in particular the ones I’d use for saltwater fishing. I pretty much settled on a default loop several years ago, a 3 nail-knot loop (does this have a catchier name?), although I was aware that I hadn’t done any strength testing, until now.
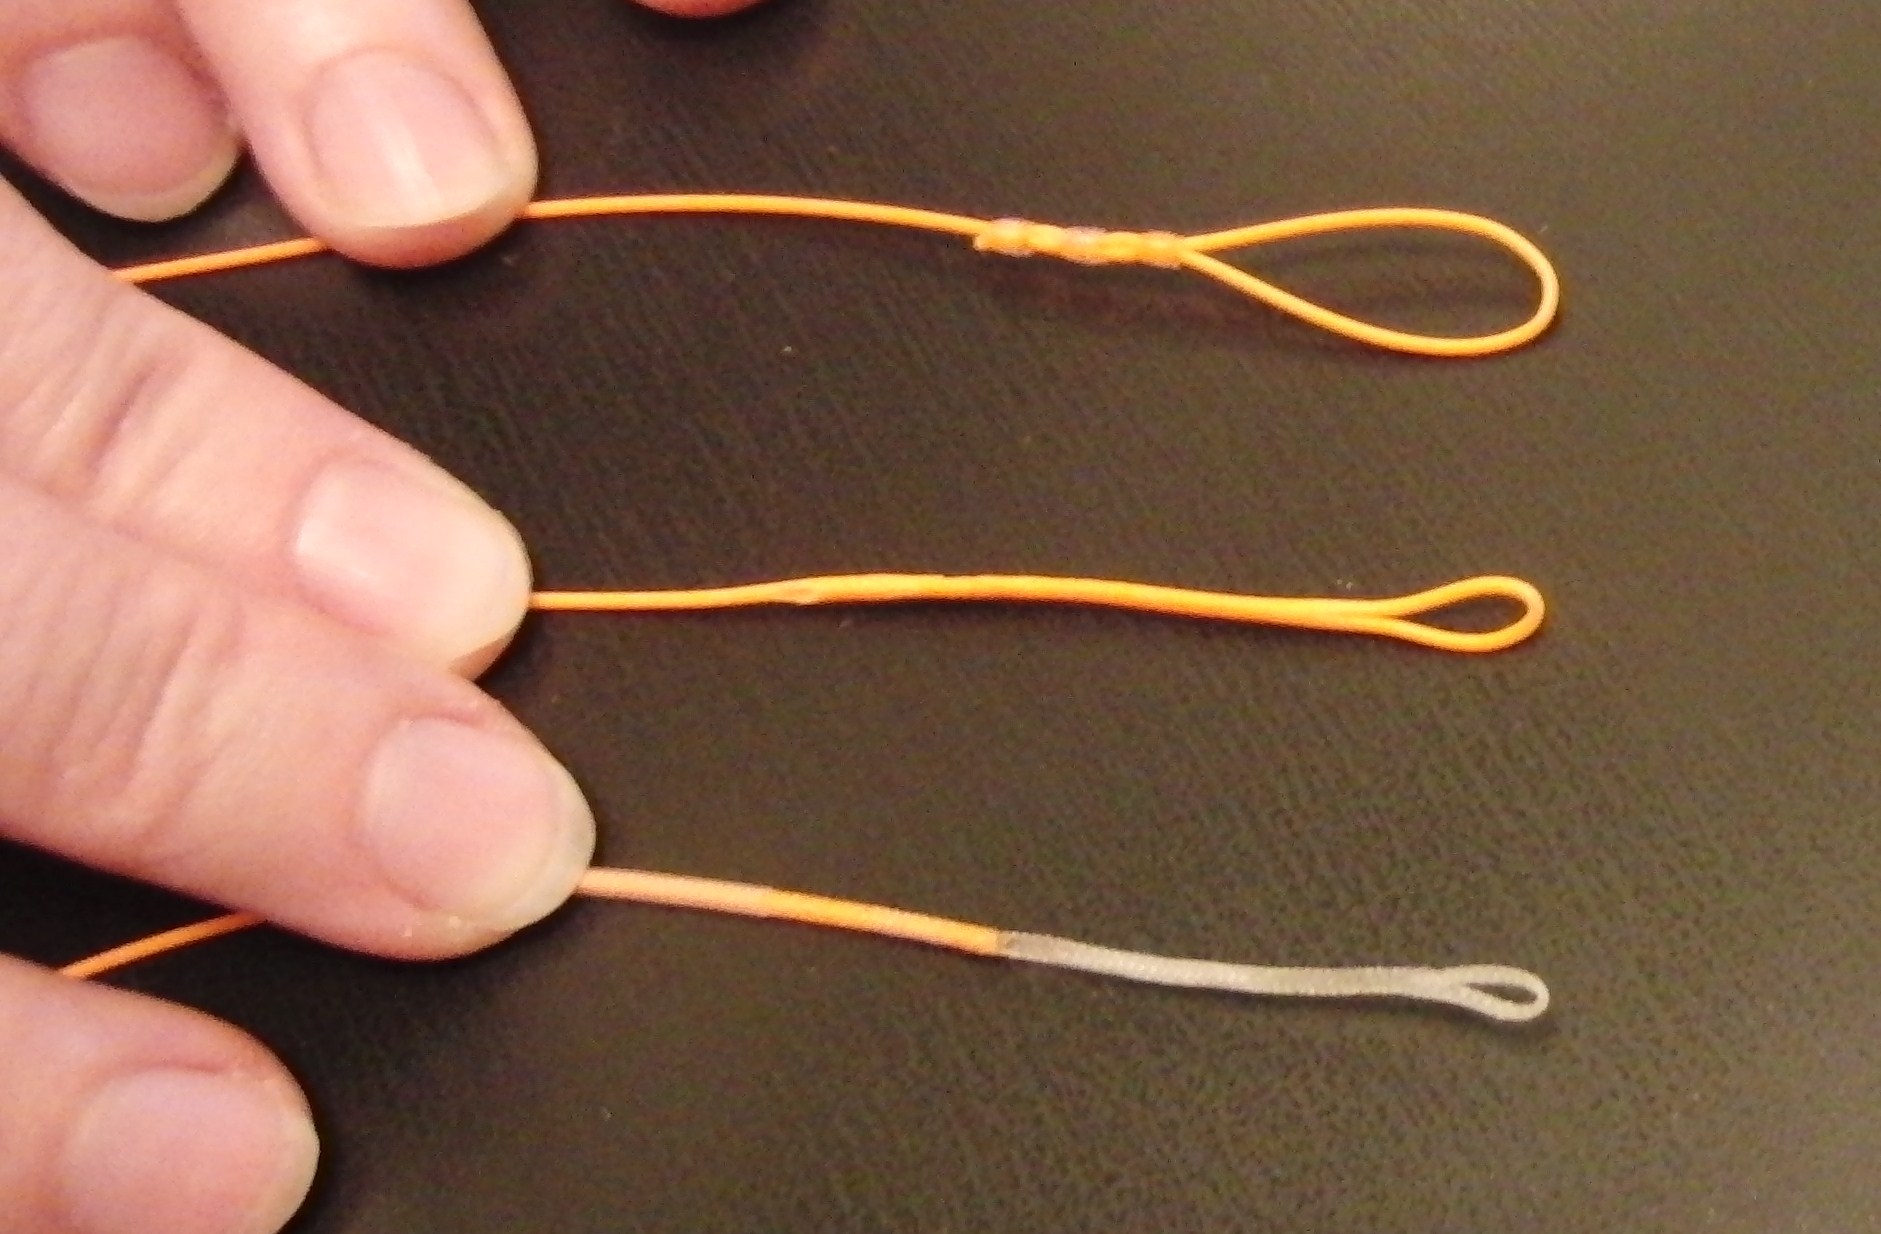
For my test I decided to field three configurations; a 3 nail-knot loop, a braid and a weld. These were all ‘tied’ in a piece of #7F running line that I had spare after chopping the belly off to make a shooting head. Before testing the loops I pulled a plain section of line to failure in order to get a baseline performance. I should point out at this junction that, due to time constraints, I only performed one test (and only one test on each of the loops too). This is far from ideal, however it kind of reflects real life – we don’t get to tie six loops, test them and use the best one when preparing our fishing lines.
The result from the ‘plain’ line is shown in the chart below. There are a couple of things to take from this; firstly the ultimate tensile strength was ~113N (11.5kg or 25lb). Secondly, at around 100N (10.2kg or 22.5lb) the line appeared to ‘yield’. Yielding is the point at which a material exhibits a behaviour that is no longer purely elastic, i.e. it won’t totally recover its original dimensions when the stress is released. As such, beyond this loading level the line is permanently damaged. I’ve actually seen this happen in a fishing scenario – on a trip with some guys who had been battling with Yellowfin tuna the day before I noted a spiral pattern of damage in one of their lines where the coating had de-bonded from the core and split slightly. (I also saw some film from the day, it consisted of a Swedish chap wearing only a pair of budgie smugglers and a buff, pumping hard from the hips on a 12 weight wedged between his legs whilst shouting oh yah, ooooh yaaah! He definitely looked like he’d appeared in more than one Swedish movie before). The photo of the line after my test shows some distinctive ‘crinkles’ in it, I suspect this is evidence of a similar level of abuse.

The first loop that I tested was the braid. Initially I tried to make a double-walled arrangement similar to a Moser loop, however I found that I couldn’t work the fly line up the middle in my DiY version. I therefore settled for a single layer of braid covering the fly line which was held in place by a plastic sleeve. The loop and the braid/line forward of the sleeve then had a few drops of super-glue applied in order to hold them in place.
As can be seen in the ‘after’ photograph, the failure of this arrangement occurred below the braid in the un-modified line, at a load of 110N or 11.2kg/24.7lb (I’d say this was in-line with the ‘bare line’ sample – this is where having some statistics from multiple tests would help). One interesting aspect of this test was that I didn’t find the plastic sleeve after it, I suspect it was flung off during the elastic spring-back when failure occurred. Due to the extent of the axial strain in the fly line at high loading levels the diameter of the line would have been significantly reduced, allowing the sleeve to be jettisoned. I imagine the sleeve’s purpose is more about preventing the end of the braid from fraying rather than holding it in place, however seeing it ‘disappear’ in this test convinces me that I’d prefer to whip my braided loops in place, as many others recommend. 
The second sample to be tested was the welded loop. Before I go on to the result I have a confession to make; the loop I made was a bit crap! Unfortunately I couldn’t find any clear shrink tubing so I had to make do with using electrician’s ‘earth’ sleeving. As such, I couldn’t see what was happening during the welding process. Upon removing the sleeve I was really happy with the quality of the weld, however I hadn’t gone the full length that I’d wanted to and there was a small length of non-joined, doubled up line at the lower end of the heating area. I could have just snipped the offending piece of line off but I decided I’d try and re-weld that small section. This second weld was not as good as the first, the plastic didn’t seem to flow nicely and, upon inspection, there was a very small area where the core of the fly line was exposed.
It was at this exposed point where the failure in the pull test occurred, at a load of 86N or 8.8kg/19lb The actual welded loop showed absolutely no signs of damage though (as seen in the ‘after’ photo). As such, I suspect the only conclusion that can be made is that I did a poor job of the welding process. However, if you’re going to use a weld I’d recommend you thoroughly inspect it before use, especially if you, like me, are inexperienced at making them.
Finally I tested the 3 nail-knot loop. As I’ve previously stated this is my preferred option, although if a line comes with a factory welded loop I will use it. I make each individual nail-knot with 8 turns of 15lb nylon. Nail-knots have to be pulled snug very carefully in order to avoid the windings ‘jumping’ over each other, I tighten them whilst viewing with magnification – working each turn into position against the next with my thumbnail. I’ve also found that with too many turns you end up with a barrel-shaped knot; tight at either end but less so in the middle, hence why (for me) I think around 8 turns is the optimum.
This was the only one of the three tests that failed in the loop. That said, the failure was at the bite point of the loop-to-loop connection (I used 50lb nylon with a perfection loop to attach to the line in all the tests) rather than the binding of the loop itself. Failure occurred at a load of 109N or 11.1kg/24.5lb, again I’d say this was not to dissimilar from the bare-line result. A close inspection of the nail-knots after the test showed they were in excellent condition although the lower one of the 3 did have some tiny gaps in the windings that were not previously there. This bears out my experience in fishing this set-up where occasionally I’ve had to re-tie this bottom knot (this one experiences more strain than the others as it doesn’t fully benefit from the stiffening offered by two constrained fly line cores).
So, despite the lack of data, I think I’ve learnt some points from this exercise. 1) Don’t put the drag setting on my saltwater reels beyond where I might damage the line. 2) Braids for heavy duty work are probably best whipped rather than sleeved. 3) Learn to weld lines properly. 4) There is no 4! 5) Keep an eye on the bottom knot of a 3 nail-knot loop and lastly 6) perhaps look to ‘cats-paw’ the loop-to-loop connection in order to spread the load.
Cheers, James