
Bernd Ziesche | Wednesday, 9 December 2020
When fly fishing for Zander and perch near the bottom or even on the bottom, it gets very tricky not to miss most or even all of the takes. For years I have been working to understand what really happens down there!
Especially in winter both Zander and perch very often inhale the fly (sucking it in) only to spit it out again a millisecond later. This way they make it hard (often impossible) for us to feel the take as I wrote in my last front page "Underwater secrets in fly fishing".
At the moment I have different line setups, which I all studied fishing wise for a serious while during the last seasons. My main target was to solve the riddle of how to successfully catch Zander and perch in winter, when they are much less aggressive as in summer.
Here are my different line setups for chasing those 2 species of fish in a depth of 3 to 6m:
Line Setup 1

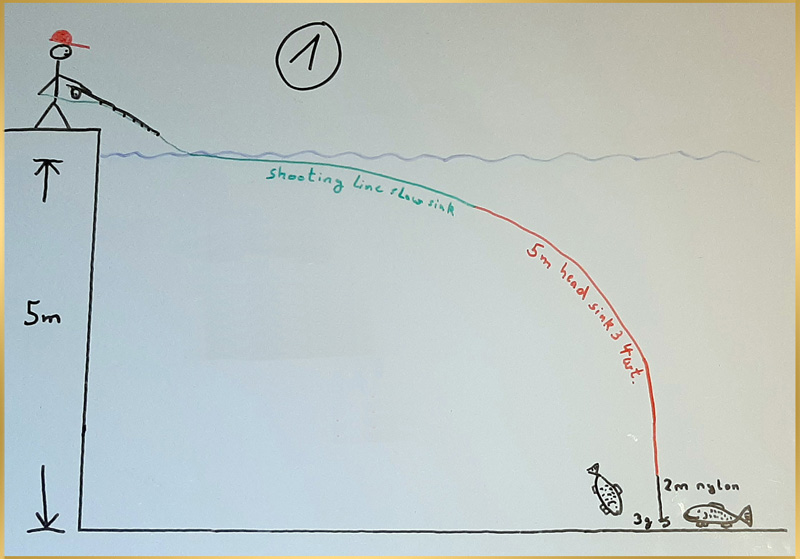
With this setup I clearly landed most Zander yet. It helped me to come even in the number of catches with my good friend and drop shot (spin fishing) expert Hansi. For years he was outnumbering me with his incredible catches.
Using a heavy fly of around 3-4 gram makes the fly pulling down the 4-5 wt. sink 3 fly line pretty fast. This way I can see the line getting slightly slack in exactly the moment when the fly hits the bottom. This is very important because if I don't start the next strip right now, I will have slack in my leader due the fly line further sinking. I would miss ALL takes for sure!
With this setup I can feel a fair number of Zander takes as long as they are not too small. The bigger the Zander are, the harder they suck in our fly.
Line Setup 2a

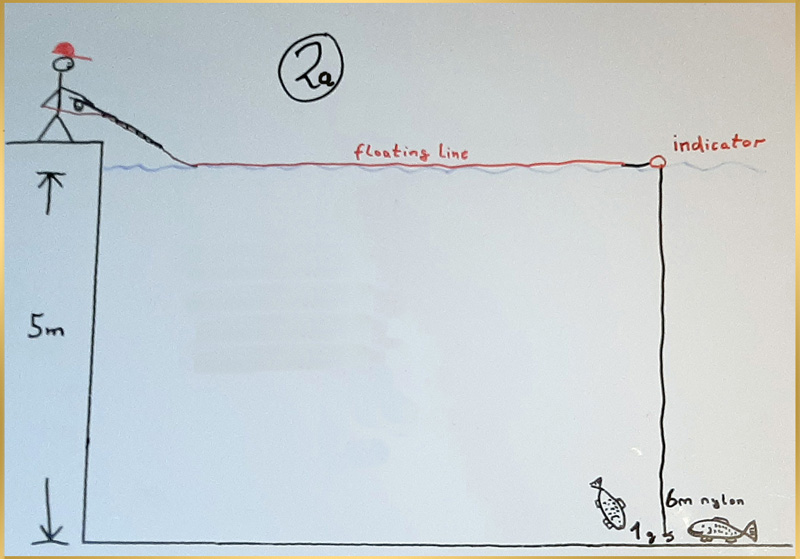
This setup I have only been testing for some days now. The one big issue with all other main setups is, that our fly line absorbs almost all takes down deep! Zander and especially perch mostly don't suck in the fly that hard, that all our line would be moved here. This is why I was searching for a way to eliminate the resistance our fly line offers to the fish when they take the fly. Using a strike indicator was a great idea.
This setup allows me to use all different weights of flies which means I can vary the speed of my sinking fly when pausing after a strip! Brilliant, because sometimes it's the fast movement and in winter often it's the slow movement they want.
In addition I now can strip or drift my fly perfectly over the stones not loosing a single fly into the stones! Especially when fishing a serious current over rocks this is a huge bonus both in order to see the takes and to perfectly present our fly to the fish.
Obviously casting a 6m long leader with having a bubble indicator at the beginning of the butt section gets tricky! But it's doable. In less water depth this method works brilliant casting wise, too!
Yet there are very few fly fishermen to be found fishing streamers below bubble indicators. Believe me it's well worth a thought not only on Zander and perch!
Line Setup 2b

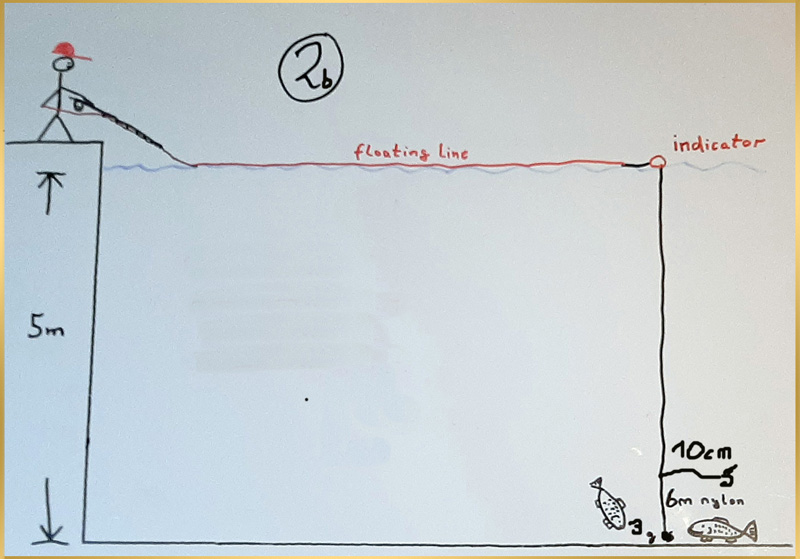
This is a typical drop shot setup like spin fishermen use it often. Only here the bubble indicator keeps the leader going vertical. Both line setup 2a and 2b are a way of fishing pelagic on a controlled distance! Usually one needs a boat to do this. With this setup I get my fly down fast even when using a very light fly just moving slowly in front of the fish. The bubble indicator though has to have a serious size unless you want to present a very small fly. You may have a look in the pictures below to see the size I mainly used.
Line Setup 3

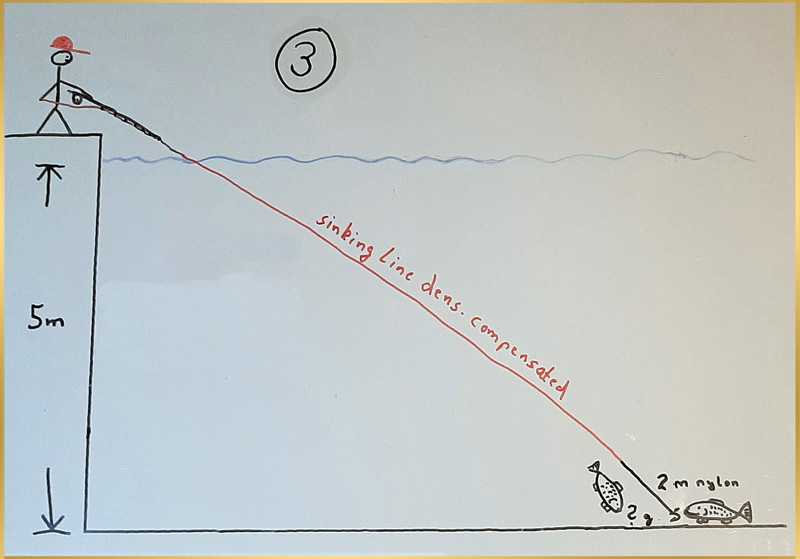
Many fly line manufacturers and fly fishing experts these days are telling us, that we need density compensated fly lines for having the straightest (best) connection to our fly when fishing down deep. Well this may hold true when you don't want your fly hopping directly over (on) the bottom. With these lines I constantly have to strip, because when pausing I easily produce slack in the system causing to miss ALL takes. Such a line setup is a proper choice when fishing constantly above the bottom, not on the bottom.
The biggest disadvantage is, that we hardly have any indication for when our fly is down at the bottom, because the falling distance of the fly during the pause gets too little (flattened angle). This means we are pretty much loosing control!
Of course you can use a very heavy fly here too. Then you get little closer to line set up 1. Still it would need a slow sinking line to get close to setup 1 though! But this wasn't the idea of a density compensated fly line!
Line Setup 4
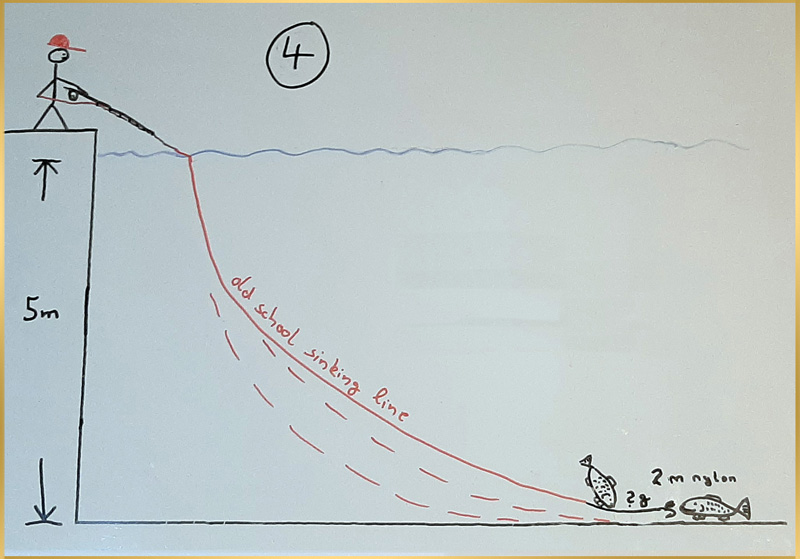
This setup did't work at all for my fishing in winter. If I wait too short, the fly wasn't down. If I wait too long the whole tip part of the line was laying on the bottom. This meant my fly moved only flat on the bottom snagging right into every rock. No chance of feeling any takes!
You may catch those few fish not being spooked by the line and taking the fly, keeping it and finally running off!
Clearly line setup 1 and 2 are offering me the best control about where my fly is and allows me to move it up and down in front of the fish. In addtion I could realize most takes exactly with these line setups.
As always once I understand the details I have no idea why it was so hard to get the puzzle complete. But it really was!
Hopefully I could give you some ideas for a line setup in streamer fishing which is quite a bit out of the typical box!
Right now I have to go fishing! ;)
Great fly fishing week to all of you!
All my best
Some pictures of my last days as always...
 P.s.: Thanks a lot to my buddies Hansi and Leon for joining me in countless numbers of days giving me great reference about the level of success of my line setups by catching many fish on their perfect adjusted spinfishing setups! I could never have solved the riddle without you!

